How to Repair Bare Patches in Your Lawn: A Step-by-Step Guide
May 02, 2025
How to Repair Bare Patches in Your Lawn: A Step-by-Step Guide
I’ve always enjoyed having a lush, green lawn, but over time, I noticed that there were several bare patches where the grass seemed to struggle. If you're like me, it can be frustrating to look at those unsightly spots. Fortunately, I discovered that with a little knowledge and effort, repairing those patches is totally possible. Here’s my guide on how to repair bare patches in your lawn, and some expert tips that can help you restore the beauty of your outdoor space.
1. Understand the Cause of Bare Patches
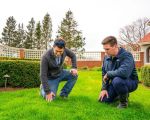
Before you dive into the repair process, it’s essential to understand why those patches are appearing in the first place. In my experience, bare patches in lawns can be caused by a variety of factors, and identifying the root cause is key to choosing the right repair method.
Some common causes of bare patches include:
- Foot Traffic: High traffic areas, especially in places where people frequently walk, can wear down the grass.
- Pet Damage: Dogs often leave patches where they dig or relieve themselves.
- Poor Soil: Compact soil or poor drainage can prevent grass from growing.
- Pests or Disease: Lawn pests like grubs or diseases such as fungal infections can kill off grass in certain areas.
- Lack of Sunlight: Grass often struggles in shaded areas or places where it doesn’t receive enough sunlight.
In my case, I found that the bare patches were mainly due to compacted soil and high foot traffic. Addressing these issues helped me make the necessary repairs.
2. Prepare the Soil for Reseeding
Once I identified the causes, the next step was to prepare the soil for reseeding. This step is critical because grass seed needs good contact with the soil to germinate properly.
I started by using a rake to remove any dead grass, debris, or thatch from the bare patches. This clears the area and allows the soil to breathe, which is essential for seed germination. I also lightly loosened the compacted soil by using a garden fork to aerate the soil. Aeration creates tiny holes that allow the grass roots to grow deeper, improving water and nutrient absorption.
For areas with poor drainage, I added a thin layer of compost to enrich the soil. It worked wonders for improving soil structure and providing nutrients to the new grass.
3. Choose the Right Grass Seed
Choosing the right grass seed is another important step in the repair process. There are different types of grass seeds suited for various climates and growing conditions. Since I live in a region with mild winters and hot summers, I selected a warm-season grass seed like Bermuda or Zoysia, which thrives in these conditions.
If you’re not sure which grass seed is right for your area, it’s a good idea to visit a local garden center or consult with a lawn care expert. They can recommend the best seed variety based on your region’s climate, soil type, and the amount of sunlight your lawn receives.
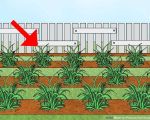
4. Seed the Bare Patches
Once the soil was prepped and I had my grass seed ready, it was time to seed the bare patches. I spread the grass seed evenly across the area, making sure to cover the soil completely. For best results, I used a broadcast spreader to ensure an even distribution.
After spreading the seeds, I lightly raked the soil again to help the seeds settle into the soil, and then I watered the area gently. It’s important not to use a heavy stream of water, as this can wash away the seeds. A fine mist works best, and I made sure to keep the soil consistently moist without over-watering.
5. Take Care of Your Lawn During the Germination Process
One of the things I learned during the repair process is that patience is key when it comes to growing new grass. Over the next few weeks, I made sure to continue watering the lawn regularly, keeping the soil moist but not soaking wet. I also avoided walking on the freshly seeded areas to prevent disturbing the seeds.
While the grass started to grow, I noticed that some spots required a little extra attention. In areas where the grass wasn’t sprouting well, I added a bit more seed and watered it more frequently.
6. Maintaining Your Lawn After Repair
Once the grass had sprouted and begun to fill in the bare patches, I knew that maintenance would be important to keep the lawn healthy. I made sure to mow the new grass regularly, but I waited until it reached about 3 inches high before cutting it for the first time.
Fertilizing the lawn is another crucial step in maintaining its health. I applied a balanced fertilizer a few weeks after the grass started growing, which provided essential nutrients to the grass roots. This helped the new grass become stronger and more resistant to disease.
Additionally, I continued to monitor the areas where the grass had been thin to make sure they didn’t develop new bare patches. Regular aeration and proper watering became key parts of my ongoing lawn care routine.
7. Tips for Preventing Bare Patches in the Future
After successfully repairing my lawn, I also wanted to prevent future bare patches. Here are some strategies I’ve implemented:
- Limit Foot Traffic: I created designated paths for walking and placed mulch or decorative stones in high-traffic areas to reduce wear on the grass.
- Healthy Soil Practices: Regularly aerating the lawn and adding compost helps keep the soil healthy and nutrient-rich.
- Proper Watering: I made sure not to overwater my lawn, which can cause root rot and other issues. Instead, I watered deeply and infrequently to encourage deep root growth.
- Pest Control: I took steps to prevent pests by applying natural pest control methods and keeping an eye out for signs of damage.
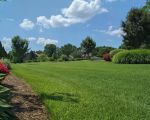
By following these steps, I’ve been able to enjoy a lush, green lawn without the hassle of dealing with bare patches.