


Why Lawn Dethatching Matters
Dethatching your lawn is a crucial maintenance step that many homeowners overlook. Over time, grass clippings, leaves, and other organic matter build up on the surface of the soil, creating a layer known as thatch. A thin layer of thatch can be beneficial, but when it becomes too thick, it can prevent water, nutrients, and air from reaching the roots of your grass. This can lead to a weakened lawn, poor drainage, and increased vulnerability to pests and diseases.
How to Identify When Your Lawn Needs Dethatching
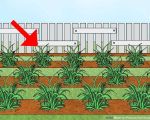
Identifying whether your lawn needs dethatching is relatively simple. First, check the thatch layer by pulling back a small section of grass. If the layer is more than half an inch thick, it’s time to dethatch. A healthy lawn should have a thin layer of thatch, ideally less than 1/2 inch, which allows water and nutrients to penetrate easily. Signs that your lawn might need dethatching include yellowing grass, areas of poor growth, and patches where water pools after rain.
Tools You Need for Dethatching
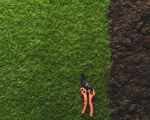
There are a few essential tools you'll need to properly dethatch your lawn. The first and most common tool is a dethatching rake, which you can use to manually remove thatch from smaller areas. For larger lawns, a dethatching machine, also known as a power rake, is highly effective and saves time. If you're looking for precision and efficiency, a vertical mower is another option that can remove thatch while also aerating your lawn. It’s important to choose the right tool based on the size and condition of your lawn.
Step-by-Step Guide to Dethatching Your Lawn
Once you've identified the need for dethatching and gathered your tools, follow these steps:
- Prepare Your Lawn: Mow your grass to about 1 to 2 inches tall to make the dethatching process more efficient. Remove any debris such as sticks or large stones.
- Choose the Right Time: The best time to dethatch your lawn is during the growing season, preferably in early spring or fall when the grass is actively growing.
- Dethatching: If you're using a dethatching rake, work in small sections, pulling the rake through the grass to remove the thatch. For a dethatching machine, move in slow, even rows across the lawn.
- Clean Up: After dethatching, collect the removed thatch and any debris. You can compost the thatch or dispose of it as yard waste.
Aftercare and Maintenance Tips
After dethatching, it's important to give your lawn the care it needs to recover. Here are a few aftercare tips:
- Water Properly: Water your lawn deeply but infrequently to encourage strong root growth.
- Fertilize: Apply a balanced fertilizer to provide essential nutrients for regrowth.
- Overseed: If your lawn is thin in areas, overseed with the appropriate grass seed for your climate and lawn type.
When to Call for Professional Help
While dethatching is something many homeowners can do themselves, there are situations where it’s best to hire a professional. If your lawn has a thick layer of thatch or you’re not sure how to handle the job, a lawn care professional can ensure the work is done properly. Additionally, professionals have access to high-end equipment that can save time and effort.
When you notice thatch buildup affecting your lawn’s health, remember that dethatching can bring your grass back to life. If you're looking for professional help, [Lawn Care Services](https://www.lawncareservices.com) offers expert lawn maintenance options to ensure your yard stays healthy and thriving year-round.